| Dan Pilone is a Software Architect for Blueprint Technologies and an active contributer to Open Source community. (more) |
Related Sites
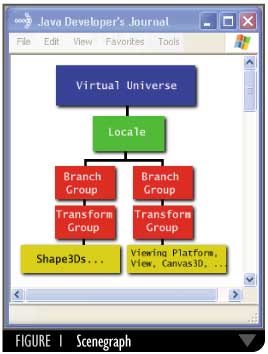
· Figure 1
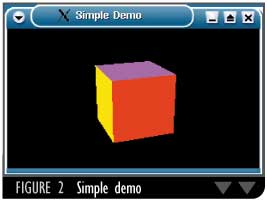
· Figure 2
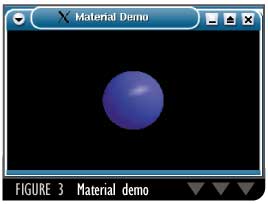
· Figure 3
· Source Code
Summary
Java 3D is not a newcomer to the Java API world; however, it has suffered from slow acceptance due to the general resistance to client-side Java. Now that machines are faster, hardware 3D accelerators are a dime a dozen, and newer JVMs rival native code, client-side Java and 3D graphics are finally making headway.
Java 3D is not a newcomer to the Java API world; however, it has suffered from slow acceptance due to the general resistance to client-side Java. Now that machines are faster, hardware 3D accelerators are a dime a dozen, and newer JVMs rival native code, client-side Java and 3D graphics are finally making headway. This article presents a brief background on Java 3D, a few example applications, then finally some hints on using it in the real world. Historically, 3D graphics have been very computationally intensive and required highly tuned coding to get it right. Starting with Silicon Graphic's (SGI) GL, the API consisted of expressing points to make up lines and polygons. Rotations and translations were expressed as matrix manipulations using a matrix stack. To help spread the word about 3D graphics, SGI, along with a collection of other vendors, developed OpenGL, an open standard to describe 3D geometry and rendering attributes. OpenGL became the standard for 3D graphics for quite some time, to the point of implementing the specification almost exclusively in hardware. OpenGL is a C-based specification, dealing with points, lines, and matrices like its predecessor. A typical set of OpenGL instructions looks like:
glPushMatrix(GL_MODELVIEW_MATRIX); Later came DirectX (or more appropriately, Direct3D), Microsoft's own 3D API. While not as widely accepted by the scientific and engineering industry, it has become successful in the gaming world. DirectX is still a C-based API, though it takes a slightly different approach to optimizing graphic rendering than does OpenGL. As object-oriented programming became mainstream, people attempted to get away from the procedural approach to 3D graphics and introduced the concept of an object-oriented scenegraph. This is the basis of Java 3D. At the time of this writing, Java 3D is at version 1.3 and easily available for Linux, Windows, and Solaris with varying degrees of support for other platforms. Java 3D provides a platform and rendering language-independent 3D programming API. Java 3D does not do its own 3D rendering. Rather, it delegates to a native library that uses the system's underlying OpenGL or DirectX capabilities. Only OpenGL is available for Linux or Solaris; however, Windows users have the option of either. By utilizing the OS's rendering capabilities, Java 3D can take full advantage of hardware acceleration without the need for special Java or Java 3D drivers. Likewise, if you don't have hardware acceleration, Java 3D can run happily in a software-emulated (e.g., Mesa) world. It's an optional API that's available as either an SDK or runtime environment and is installed after the Java SDK or JRE. All the examples presented in this article were written under Linux using the Java 1.4.1 Release Candidate and Java 3D 1.3. They were tested under Mesa software OpenGL and nVidia's hardware-accelerated OpenGL drivers for both Windows and Linux. As mentioned earlier, the concept of the scenegraph is core to Java 3D. A scenegraph is a directed graph that represents the geometry, material, and lighting, among other things, in your rendering (see Figure 1). The scenegraph starts at the root with a VirtualUniverse and includes transformations and geometries to define the objects in your virtual world. Hanging off the other side of this virtual world is the ViewingPlatform, the peephole into your scene. Java 3D optimizes, culls, and draws your scenegraph for you. If you make use of Java 3D's Behavior classes it will even move your ViewingPlatform around the scenegraph in response to user navigation keys. The scenegraph provides an object-oriented abstraction of 3D rendering much like a VRML or Ray Tracing language. Elements of your scenegraph are represented as Shape3Ds, which have Geometries to define their physical shape, MaterialAttributes to define their material, TextureAttributes to define textures, etc. This allows you to define your scene at a much higher level of abstraction than pushing and popping matrices, and encapsulates your geometry and rendering options in their own classes. In addition to the higher level of abstraction, the scenegraph provides you with immediate scene optimization capabilities. OpenGL and DirectX don't offer any way of doing high-level culling of objects. To cull entire objects from a scene you would need to implement your own BSP-Tree or other geometry-sorting data structure. Java 3D's scenegraph provides culling, possible matrix or geometry combining, and multithreaded rendering with no effort on your part. Without further ado, let's start with the "Hello World" of 3D graphics, a cube (see Listing 1). (Listings 1-3 can be downloaded from www.sys-con.com/java/sourcec.cfm.) All 3D rendering is done into the AWT widget Canvas3D. Since this is a heavyweight component, you must place it in a Swing container that can handle such components, such as a JFrame, JSplitPanel, etc. It will not behave properly inside a JInternalFrame, for instance. A Canvas3D wants the graphics configuration describing the type of canvas to create. This configuration describes the minimal capabilities that the Canvas3D, and by association the underlying 3D rendering library, must support. For the examples we'll be using a basic 3D environment so we'll use the default capabilities. These can be retrieved using SimpleUniverse.getPreferredConfiguration(). Once the Canvas3D is in place we will create our VirtualUniverse. The VirtualUniverse is the top level of the graphics hierarchy in a Java 3D application. It knows about the Canvas3D it should render into and owns the scenegraph of objects to render. An application may subclass VirtualUniverse to provide custom initialization such as multiple viewing locations on the view side or multiple points of reference (Locales) on the rendering side of the scenegraph. Java 3D comes with a default VirtualUniverse implementation, a SimpleUniverse. The SimpleUniverse is adequate for most simple Java 3D applications and we'll use it here. The initial viewing configuration places us, the trusty viewer, at 0,0,0 looking down the negative Z axis, +X is right, +Y is up. To place an object in our scenegraph we need to define where it lies in 3D coordinates. We specify location by applying rotations and transformations using Transform3D objects. We will place a cube 50 meters in front of us on the Z axis and rotated 20 degrees around X and Y for effect. A quick warning: a Transform3D is effectively a matrix and may be combined with other Transform3Ds to achieve the desired results. However, Transform3D's methods typically replace the current matrix with new values. For example, if after performing a 20 degree rotation around X, you then perform a 20 degree rotation around Y, you will overwrite (and therefore lose) your X rotation. To achieve both rotations you need to create two Transform3Ds, then combine them by multiplying one by the other. This is demonstrated in lines 33-39 in Listing 1. Transform3Ds cannot be directly inserted into the scenegraph; rather they are wrapped in a TransformGroup and the TransformGroup is placed into the scenegraph. The transforms will be evaluated in order beginning with the root of the tree, so we attach the translation group to the scenegraph, then the rotation group to the translation group (translate, then rotate). We now have rotations and translations to get us where we want to be, but nothing to draw. All objects rendered in a scenegraph are described using Shape3Ds. Shape3Ds contain the geometry, material properties, texturing information, and what Java 3D calls rendering attributes (things such as depth testing, antialiasing, etc.). Shape3Ds may only be inserted once into a scenegraph; however, the geometry and other attributes may be shared between Shape3Ds. Sun provides a convenience class named ColorCube that is a Shape3D with geometry attached defining a cube with six different-colored faces. As with Transform3Ds, Shape3Ds cannot be inserted directly into the tree. They must be attached to a group, so we attach the cube to the bottom TransformGroup. This entire branch is then attached to a BranchGroup (Java 3D's generic container group). To take advantage of Java 3D's optimization capabilities, you should call compile() on any BranchGroup before inserting it into the scenegraph. For a specific list of optimizations Java 3D can perform on a branch, consult the Java 3D documentation. After compiling we attach the branch to our Universe. Finally, we place the Canvas3D in a JFrame as the center component in a BorderLayout. Run this application and you should see a cube doing its "Blue Steel" pose (see Figure 2). If all Java 3D could do was render colored cubes, it wouldn't be very impressive. However, Java 3D's scenegraph can contain not only objects to render, but behaviors that manipulate those objects. In Listing 2, lines 55-60 add a MouseRotate behavior to our SimpleDemo.
// Create a MouseRotate Behavior To support dynamic updating of the rotation group we need to tell Java 3D that we will be modifying the matrix values. This prevents the scenegraph from optimizing out our rotations during compilation. Calling setCapability() with the constants TransformGroup.ALLOW_TRANSFORM_WRITE and TransformGroup.ALLOW_TRANSFORM_READ will allow us to modify the transform and update the rendered scene accordingly. Note that these must be done separately; you cannot OR capabilities together. Next, we create a MouseRotate behavior passing it the rotation TransformGroup. A behavior has the concept of bounds, meaning a spatial area around a point where this behavior is active. For our application we will create a BoundingSphere that covers the entire scene. Finally, we add the behavior to the scenegraph. When BehaviorDemo is run you can now rotate the cube by clicking in the Canvas3D and dragging the mouse. Not bad for five more lines of code. Java 3D comes with a small collection of behaviors that will do fine for simple applications. However, more complex applications will likely need to provide their own behaviors or extend the included ones. Sun ships KeyboardNavigation, MouseNavigation, MouseRotation, and several Interpolators that allow you to rotate or translate objects based on a starting point, end point, and duration. In addition to position manipulation there are sound-based, frame-based, and level of detail-based behaviors you may add to your scenegraph. The final example demonstrates adding lighting to the scene (see Listing 3). In this example I switched to a sphere, using another of Sun's utility classes. Since we are using a sphere we can eliminate our initial rotations. However, we'll keep the MouseRotate to help show the effects of dynamic lighting. Once the rotations and translations are set up I create two lights, an AmbientLight that provides a not-quite-white light over the whole scene, and a directional light that causes the spectral highlights on the sphere. To have the sphere react to the lit environment, we need to define the material properties for the surface. In this case I created a blue sphere, no emission of internal light, blue reflection of external light, and white spectral highlights. The final 128.0 is the shininess factor, and since I am easily distracted by shiny things, this is all the way up. Running this demo gives a blue sphere with a white reflection on the top right (where the DirectionalLight hits it) as seen in Figure 3. While Java 3D is a huge leap forward from OpenGL, it's not all peaches and cream. Fortunately, there are a good number of FAQs and mailing lists out there to help Java 3D developers, and the user community is very responsive. However, here are a few of the common problems encountered with Java 3D. First is the overall issue of garbage collection. While this can cause slightly annoying pauses in normal applications, it could easily destroy the user's immersive experience using a 3D application. Unfortunately, there's not much I can offer by way of help here, other than to be aware of your memory allocation particularly in behaviors. Java 1.4.1RC actually seems to offer a smoother run of the application than even 1.4.0 did, but given enough memory allocation and release the pauses are noticeable. You've been warned. Another common FAQ issue involves using Java 3D with Swing components. Java 3D plays nicely with most Swing components as long as you disable the lightweight popup support. Specifically, this almost always needs to be done for tooltips and menus. The following lines of code will handle that:
JPopupMenu.setDefaultLightWeightPopupEnabled(false); The final tip relates to Java 3D's multithreaded implementation. It fires off somewhere between four and eight (or more) threads to handle the scenegraph, rendering, behaviors, etc. The plus side is that things scale very well to multiprocessor machines. The downside is that you must be careful to avoid "half-baked" frames being drawn. For example, in an application I was working on we had a texture-mapped polygon with a billboarded text name next to it. These were two separate Shape3Ds with a TransformGroup between them. We found out the hard way that Java 3D could manage to render a frame between the time we updated the polygon's new position and corrected the text for the new billboarding rotation. This led to text that would slide along with the polygon then snap back to face the user, lovingly coined "tail-whipping" by a co-worker. Worse yet, this seemed to appear only on faster machines (ones where Java 3D could render that split-second frame before we fixed the billboarding). Issues such as these require you to carefully lay out your scenegraph and be aware that rendering is happening in a separate thread. Java 3D offers an intuitive and cross-platform 3D API for desktop applications as well as applets. The user community is very active and supportive. For more information, check out http://java.sun.com/products/java-media/3D. Mailing list information, FAQs, and community-written utilities are available at www.j3d.org. Finally there are no excuses left for not having 3D time-wasting games for Linux. SIDEBAR
3D 101 |
About the author
Related Sites
|